Wednesday, March 4, 2009
Tuesday, February 3, 2009
Monday, February 2, 2009
mysql optimization
First Way:-
1) query_cache_type: Specifies the operating mode of the query cache.
Three possible values can be assigned to this variable: 0, 1, and 2.
Finding info about Query_cache_type
show variables like “query_cache_type”;
Setting Size of Query_cache_type
set GLOBAL query_cache_type=0;// off
set GLOBAL query_cache_type=1;// on
set GLOBAL query_cache_type=2;// no Sql cache
2) query_cache_limit: Specifies the maximum size that a result set can be in order to be cached. For example, if the limit is set to 2M, no result set larger than 2MB will be cached. The default limit is 1MB.
Finding info about Query_cache_limit
show variables like “query_cache_limit”;
Setting Size of Query_cache_limit
set GLOBAL query_cache_limit=1000000;// 10MB set
3) query_cache_size: Specifies the amount of memory allocated for caching queries. By default, this variable is set to 0, which means that query caching is turned off. To implement query caching, you should specify a query_cache_size setting in the [mysqld] section of your option file. For example, the setting query_cache_size=10M enables query caching and allocates 10M of memory to the cache.
Finding info about Query_cache_size
show variables like “query_cache_size”;
Setting Size of Query_cache_size
set GLOBAL query_cache_size=1000000;// 10MB set
Second Way:-
1) use a text editor such as Vim or Notepad to modify your option file to include a setting for the query_cache_size system variable. For Linux users, add a query_cache_size entry to the [mysqld] section of the my.cnf file in the root directory.
query_cache_size=10M
2) For the changes in the option file to take effect, you must shut down the MySQL server. In Linux, execute the following command at your operating system’s command prompt:
mysqladmin -u root -p shutdown
When prompted for a password, enter your password and press Enter. The service is stopped.
3) Now you must restart the MySQL server. In Linux, execute the following command at your operating system’s command prompt:
mysqld_safe --user=mysql &
4). Open the mysql client utility.
5). Now view the settings for the query_cache_size system variable again and you are ready to go with new settings.
How It Works
All the steps that you took in this exercise should be familiar to you from previous chapters. To begin, you used the SHOW VARIABLES statement to view the default settings for each system variable related to the query cache. For example, the following SHOW VARIABLES statement retrieved the current setting for the query_cache_limit system variable:
SHOW VARIABLES LIKE ‘query_cache_type’;
The results indicated that the query cache is on. When you viewed the setting for the query_cache_limit variable, you saw that each results set can be 1048576, or 1M. Next you viewed the query_cache_size variable, which was set to 0. This meant that no SELECT statement result sets were being cached.
Once you verified the settings for all three system variables, you added or updated the following setting in the [mysqld] section of your option file:
query_cache_size=10M
This entry sets the query cache size to 10M. You implemented the new setting by stopping the server and then restarting it. From there, you opened the MySQL client utility and used the SHOW VARIABLES statement once more to verify the query_cache_size system setting. The results indicated that the new setting had been implemented. Now your SELECT statements will be cached, which should improve the performance of your SELECT statements. You could have also specified different settings
for the query_cache_type and query_cache_limit system variables in your option file, but it wasn’t necessary. Because you didn’t, the default values for both variables are used.
Saturday, January 31, 2009
Friday, January 30, 2009
Remote desktop on linux using VNC
Introduction
As an Windows administrator, I always have to work with many Windows servers. Most of the time, I use remote access rather than go to in front of each server. This can be done easily because they’re the same platform. But sometime I also need to access Linux server from Windows XP, too. This can be done by using VNC. By default, VNC is alrealy installed on Redhat so I only need to configure it as VNC server and I have to install VNC Viewer on Windows XP. When enable this service, please keep in my that others can also remote to the server with this protocol, too!. So if your network can’t be trusted, do not enable the vncserver service. But in my case, I have firewall to limit only from my computer and the network is trusted.
VNC stands for Virtual Network Computing. It is remote support software which allows you to view and fully interact with one computer desktop (the “VNC server”) using a simple program (the “VNC viewer”) on another computer desktop anywhere on the Internet. The two computers don’t even have to be the same type, so for example you can use VNC to view a Windows Vista desktop at the office on a Linux or Mac computer at home. For ultimate simplicity, there is even a Java viewer, so that any desktop can be controlled remotely from within a browser without having to install software.
Step-by-step
In this section, I’ll show how to configure VNC server on Redhat server and using VNC Viewer connect the server remotely from Windows XP.
- On Redhat server, login with your username that you want to enable remote access. In this example, I will use ‘admin’ user.
- Open Terminal, type ‘vncpasswd’. Type your password and verify password again. This command will use to set you password for remote access for the current user.
- Before next step, you need to logged on as root by type ’su root’.
- Edit the file /etc/sysconfig/vncservers by type ‘ vi /etc/sysconfig/vncservers’.
Note: If you are new to Linux, vi is an editor tool in command line mode on Linux. - You’ll see text file as in the figure below. Next, I’ll edit on the highlight line.
- Uncomment on the highlight line. If you have more than one usernames that want to enable remote acces, you can change VNCSERVERS value in this format, “1:username1 2:username2 3:username3 ….”. In this example, I have only one user which is root so this line of mine is ‘VNCSERVERS = “1:admin”‘.
- Now save the file and exit. To save file, hold ESC + ‘:’ and type ‘wq’ to write and quit file.
- Next, log off the user if you are not user ‘root’ and log in as root. Enable VNC service by type ‘chkconfig vncserver on’. Then, start the VNC service by type ’service vncserver start’.
- If you have firewall enable on Redhat, be sure that your firewall configuration won’t block connection from remote computer by open port TCP 5901 for remote access. Open Applications -> System Settings -> Security Level. Add ‘5901:tcp’ on Other ports.
Note: VNC uses TCP protocol on port 5901. - Now you can connect Redhat server from remote computer. On my Windows XP computer, open VNC Viewer on Windows XP, type IP Address of Redhat server with number as a username specify in step 6. In this example, I want to remote to Redhat server as ‘admin’ user which I assign as number 1 in step 6 (1:admin) and my Redhat server is 10.110.141.220. So I type ‘10.110.141.220:1′.
Note: You can download VNC Viewer for free at realvnc.com - Type your password for ‘admin’ user which has been assign in step 2.
- Now you have connect to Redhat server remotely. But you’ll see that the interface looks different. You have to do a little thing more.
- On Redhat server, open terminal and type ‘vi /home/username/.vnc/xstartup’. In this example, I type ‘vi /home/admin/.vnc/xstartup’.
Note: If you going to enable remote access for user ‘root’, the file would be at ‘/root/.vnc/xstartup’. - Uncomment these two lines and save the file.
Note: If you want to force to load Gnome or KDE Desktop on remote access, edit the last line from ‘twm &’ to ’startx &’ for Gnome and ’startkde &’ for KDE Desktop. - Type ’service vncserver restart’ to apply changes.
- Reconnect using VNC viewer on remote computer again. Now you will see the desktop as you were log in at the server but now you’re remotely :).
Friday, January 9, 2009
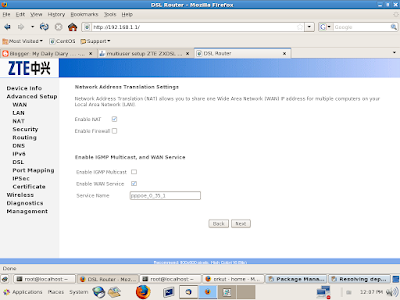
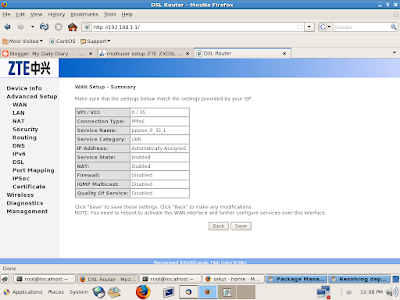
Multiuser ADSL Modem setup ZTE ZXDSL 531B for dataone
What I have did was...
1) I have opened firefox browser and enetered http://192.168.1.1/ in address bar..

2) This had opened this window and this contains ZTE 531B discriptions..
3) Now on left pane there is a option named Advanced Setup... click on this...
4)This will drop down and will show following window (WAN) on right pane by default...

5) Now select first line PPPoE protocol and click on Edit Button....
and then follow the same instructions as on screen shots....


7) Now reboot your ADSL modem and you can connect to internet without using a dialer from your own PC... :)
you can download these images for better visibility.......
Cheers...
Sandeep
Secret of Universe
Secret our universe... 10 Directions, 26 dimensions 18 Directions, No Dimension can exist 36 Dimensions, no direction can exist.. I dont h...
-
Dear friends, It took a long day today.. but yes I have resolved my CONSISTENT I945LM4/AMPTRON I945LM4 FRONT PANNEL sett...
-
1) छत पर अछी तरह झाडू लगाए.. मिट्टी पूरी तरह से साफ कर दे..(समय shaam 4 से 7 बजे) 2)अगर छत पर काले रंग की kaai उगी है तो उसे लोहे के ब्रश ...
-
Dear Friends, SemIndia may have got shutdown but its modem for MTNL /BSNL are still in market. Here is the latest patch for its bro...


